Table of Contents
Mikrotik Hotspot (Basic)
Introduction
With this scenario we assume you have:
- A recent installation of RADIUSdesk.
- We will use our cloud.radiusdesk.com demo server which has an IP Address of 164.160.89.129 in this document.
- Our cloud.radiusdesk.com demo server has a site wide RADIUS shared secret of testing123.
- A new (or reset to defaults) Mikrotik RouterBOARD 751U which you will set up from scratch.
- You want to run a Captive portal on the Mikrotik's WiFi interface.
Getting started
- To reset the RouterBOARD 751U simply hold the reset button in during start-up until the ACT LED starts flashing. Now release the reset button.
- You should now be able to connect on any of the Ethernet ports 2-5. (Port 1 needs to connect to the Internet).
- If you connect with a machine which has DHCP enabled; you will get a 192.168.88.x IP Address while the RouterBOARD 751U can be reached through 192.168.88.1.
- The default username is admin with no password.
- Newer versions of ROS insist you set a password.
- If you never had password on the device specify the old password as blank text and specify the new value and confirm it to set the password on the device.
Our approach
We will take the following configuration approach. This approach very common on the 751U.
- Ethernet port 1 (Marked PoE) will be used to connect the 751U to the Internet. (Typically a LTE router's Ethernet port)
- Ethernet port 1 will be configured to be a DCHP Client.
- Ethernet ports 2-5 will be used as a Ethernet switch which runs a DHCP Server and NAT traffic between Ethernet port 1 and Ethernet ports 2-5.
- The WiFi interface will be used to run the Captive Portal (Hotspot) on.
- This Captive Portal will regulate traffic between the WiFi interface and Ethernet port 1.
Prepare Mikrotik
Captive Portal or Hotspot?
- Mikrotik uses the term Hotspot to refer to a Captive Portal.
- We prefer to use Captive Portal which is technically speaking more correct.
In order to get a Captive Portal up and running on the Mikrotik we will need to configure and confirm the following items. We assume a device reset to factory defaults.
- Set the Mikrotik's identity.
- Confirm the Ethernet-1 port is a DHCP client and did receive a valid IP Address from our DSL router.
- Remove wlan1 WiFi interface from the bridge with the name bridge.
- Add a RADIUS server.
- Configure a Hotspot running on the wlan1 WiFi interface.
- Configure a DHCP pool that the hotspot will use for assigning IP Addresses.
- Configure a Profile that makes use of the RADIUS server which we already defined.
Set the Mikrotik's identity
- We will use a geographic naming convention and assume that this Mikrotik is the first one deployed in the city of Johannesburg in the Gauteng province of South Africa.
- The systems identity will thus be za-gp-jhb-001.
- Connect to the Mikrotik's web interface and select System → Identity.
- Specify the Identity as za-gp-jhb-001 and click Apply.

Confirm Ethernet-1's status
- Connect to the Mikrotik's web interface and select IP → DHCP Client.
- The ether1-gateway interface should be listed along with it's DHCP supplied IP Address.

- If this is not listed or the interface does not have an IP Address assigned to it; ensure that it is fixed before continuing.
Remove wlan1 from bridge-local
- Connect to the Mikrotik's web interface and select Bridge.
- Select the Ports sub-tab to see the list of ports and to which bridge they are assigned.
- By default ether2-master, wlan1, ether3, ether4 and ether5 will be members of the bridge named bridge.
- Remove wlan1 from the list of ports.
- To remove the interface click on the - button. The D button will simply disable it.
Add a RADIUS server
- Mikrotik allows you to define zero or more RADIUS servers. The Mikrotik will in turn become a client to these pre-defined servers.
- Connect to the Mikrotik's web interface and select Radius
- Click the Add new button to add a RADIUS server.
- Select the Hotspot service.
- Specify the IP Address of the RADIUSdesk server running FreeRADIUS. (We use 164.160.89.129)
- Specify the shared secret. (We use testing123)
- Since our server is somewhere out on the Internet, we increase the timeout to 5000ms.
- Leave Accounting Backup unchecked.
- Set Require Message Auth to Yes for request resp.
- Next we will set-up the hotspot
Configure a Hotspot running on the wlan1 WiFi interface
Add a Hotspot using the setup wizard
- Connect to the Mikrotik's web interface and select IP → Hotspot.
- Click the Hotspot Setup button. (Do not use the Add New option this time)
- Select the Hotspot Interface as wlan1 and click next.
- Specify the Local address of Network as 10.5.50.1/24
- Ensure Masquerade Network is selected.
- Click Next to continue.
- Keep the default value of Address Pool of Network (10.5.50.2-10.5.50.254).
- Click Next to continue.
- Specify Select certificate as none since we will not use https initially.
- Click Next to continue.
- Keep the default value for IP Address of SMTP Server (0.0.0.0).
- Click Next to continue.
- Keep the default value for DNS Servers. This will be the value assigned by the DHCP server to the Ethernet-1 interface.
- Click Next to continue.
- Keep the default value for DNS Name (empty).
- Click Next to continue.
- Supply a local admin user for the hotspot with a password.
- Click Next to continue.
- This should bring you to the end of the wizard and leave you with an entry in the list of available configured hotspots.
Understanding the Hotspot configuration
- The Hotspot Setup wizard did the following behind the scenes. You are welcome to confirm in order to understand the Mikrotik better.
- Created a DHCP server pool called dhcp1 running in interface wlan1
- Confirm by viewing IP → DHCP Server.
- Networks sub-tab will contain a ;;;Hotspot network with the 10.5.50 range.
- Created a hotspot server profile called hsprof1.
- Confirm by viewing IP → Hotspot.
- Server Profiles sub-tab will contain the hsprof1 entry.
Modify the created Server Profile
- We need to tel the hsprof1 Server Profile to make sure it use RADIUS.
- Connect to the Mikrotik's web interface and select IP → Hotspot.
- Select IP → Hotspot. Select the Server Profiles sub-tab and select hsprof1
- Make sure Use RADIUS is selected.
- Make sure Interim Update has a sane value e.g. 00:10:00 for every 10 minutes.
- Click Apply to save this value.
- You can optionally enable MAC authentication and the format of the MAC address. Select XX-XX-XX-XX-XX-XX to work with RADIUSdesk.
Your Mikrotik Hotspot is now configured. Next we will prepare RADIUSdesk.
Prepare RADIUSdesk
Our Setup
- The setup described here makes use of a VPS server that runs RADIUSdesk somewhere in the cloud. (We use cloud.radiusdesk.com)
- RADIUSdesk makes it super easy to add a RADIUS client to the FreeRADIUS server.
- Simply take care of the following items when you are pointing a RADIUS client to the RADIUSdesk server:
- Public IP Address of the RADIUSdesk server.
- Ensure the site wide shared secret is correct. (Check this with the person who configured the RADIUSdesk server)
- Ensure there is a unique identifier the RADIUS client can identify itself with to the server. (We did this by setting the Identity of the Mikrotik router.)
- After you took care of that simply reboot the Mikrotik router while it has an active Internet connection.
- It should then be reported under New Arrivals - RADIUS.
- The New Arrivals - RADIUS tab is closed by default.
- To launch it, click the New Arrivals button in the RADIUS Clients applet.
On-boarding a new arrival
- After the Mikrotik appeared under the New Arrivals - RADIUS tab we can change it to a RADIUS Client.
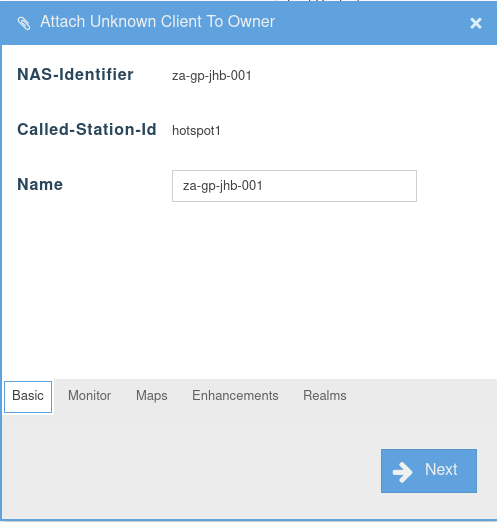
- Select the new arrival you want to change and click on the Attach button.
- This will bring pop up a window where you can provide some detail.
- Give it a name:
- The Monitor and Maps sub-tabs you can leave as default.
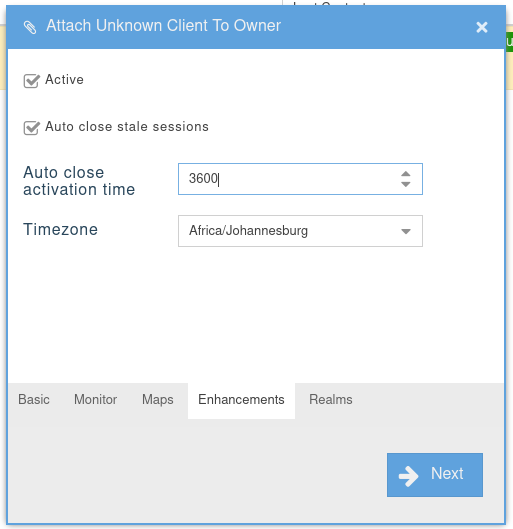
- The Enhancements tab has some handy enhancements. You are also advised to enable auto close - We give it a value of one hour (3600 seconds)
- Finally select the realms that can use this RADIUS Client.
- After you click the Next button this item will be moved to the list of RADIUS Clients. You will see this item indicates that it never contacted the RADIUSdesk server.
- Simply reboot the Mikrotik to confirm that contact is now established.
- This brings us to the end of this section.
Testing it out
- Reboot the Mikrotik
- Connect to the WiFi Access point which the wlan1 interface advertises and confirm the following
- You get an IP Address in the 10.5.50.x range
- The DHCP server assigns you a DNS server's address for name resolution.
- As soon as you try to visit a website on the Internet you are redirected to the Mikrotik login page.
- Try to connect with a valid user defined in RADIUSdesk and confirm that the authentication works as intended.
- If things do not work correct; run a debug trace on FreeRADIUS and restart the Mikrotik router.
- Confirm that the Mikrotik router does send an Accounting-On packet to the RADIUS server by looking at the debug output of the FreeRADIUS server.
What next
Although your system is up and running now you may want to do the following advanced configurations
- Introduce central managed Dynamic Login Pages for Mikrotik.
The Advanced setup page will cover these topics.


