Table of Contents
Implementing a high speed mesh using TP-Link N600 TL-WRD3500 dual radio nodes
- This Wiki page will take a hands on approach showing the steps I've taken to get to a high speed mesh using standard off the shelve hardware.
- We assume the following:
- The latest SVN of RADIUSdesk and MESHdesk running on a server somewhere in the cloud.
- A Windows machine running the latest version of the MESHdesk node config utility.
- Internet connectivity through a DSL modem.
- 5x TP-Link N600 TL-WRD3500 dual radio nodes.
- The latest MESHdesk firmware image for the TP-Link N600 TL-WRD3500.
Overview of the steps involved
- Define a new mesh network on the VPS running MESHdesk.
- Flash the MESHdesk firmware onto the TP-Link N600 TL-WRD3500 nodes.
- Use the MESHdesk node config utility to point the nodes to the VPS server running MESHdesk and also add the nodes to the mesh defined in MESHdesk.
- Turn all the nodes on and confirm all the nodes are up.
- Do some speed testing through the mesh.
Define a new mesh network in MESHdesk
Entry Points
- For this mesh network we'll turn the clock back more than 20 years (my age are showing
) and use the movie Reservoir Dogs as a 'theme'.
- We crate a mesh with the name Reservoir Dogs.
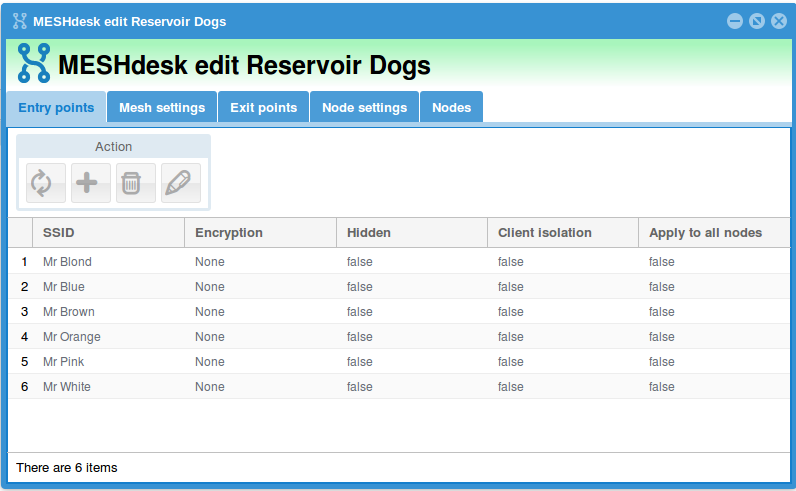
- Then we create the following entry points (SSIDs):
- Mr Blonde
- Mr Blue
- Mr Brown
- Mr Orange
- Mr Pink
- Mr White
- With our experiment we will keep them open. It is always interesting to see how many leaches one can attract.
- One important point to keep in mind is that the entry points is NOT applied to all nodes.
- The reason for this is that we want to selectively attach an entry point to a mesh node. This will help to connect to a specific node during our speed testing.
Mesh settings
- You can leave all the defaults here and just also select Bridge Loop Avoidance to be on the safe side.
Exit points
Node settings
- We use all the defaults.
- We do however also specify that the Ethernet ports on the Non-gateway nodes be bridged to the LAN.
Nodes
- Here we will add the nodes as we discover their MAC Addresses through the MESHdesk nod config utility. (This is covered later in the docuent)
- Take note that we attach one of the entry points to each node.
- Also note how we configure each of the radios respectively on each node.
- When we deselect the Mesh option we also have a choice to specify which channel the entry point should run on.
- This will give us opportunity to select non overlapping channels (1,6,11).
Next we will flash the MESHdesk firmware on the TP-Link N600 TL-WRD3500 nodes.
Flash the MESHdesk firmware onto the TP-Link N600 TL-WRD3500 nodes
- Before you can flash the MESHdesk firmware image onto the nodes you have to get the MESHdesk firmware image
.
- You can download the latest openwrt-ar71xx-generic-tl-wdr3500-v1-squashfs-factory.bin from this URL: http://sourceforge.net/p/radiusdesk/code/HEAD/tree/trunk/meshdesk/firmware/
factory or sysupgrade?
- Use *-factory* when you install OpenWrt for the first time on the nodes while it is still running the default firmware it came with.
- Use *-sysupgrade* after you already installed OpenWrt on the node. You will then use the sysupgrade utility program which is included with OpenWrt running on the node to do the upgrade.
Download or SVN Checkout
- Be warned that the download function of SourceForge code does not always work well.
- The checksum of this current version is 32048fbca9f1916fa91653e0bab4258f and size 8126464.
- My first download was not complete and it can wreak havoc.
- A better alternative will be using SVN command or a SVN client to check out the code.
- Connect a LAN cable between your computer and one of the four Ethernet ports on the TL-WRD3500.
- Ensure that your computer has an IP Address that can talk on the 192.168.0.x subnet (e.g. 192.168.0.200)
- The TL-WRD3500 listens on 192.168.0.1.
- Open a browser and go to http://192.168.0.1.
- The default username / password is admin / admin.
- Go to System Tools → Firmware Upgrade. The following screen will be displayed:
- Select the openwrt-ar71xx-generic-tl-wdr3500-v1-squashfs-factory.bin file which you downloaded and click the Upgrade button.
- Confirm your action and wait for the flash process to complete. (This means to wait out the next two screens)
- Once it is completed it will redirect to a blank page. This is because the TL-WDR3500 now runs OpenWrt and is not listening on IP 192.168.0.1 any more.
- Unplug the power and LAN cable from the node and repeat this action for all the nodes.
- Once you are finished with all this, it is time to point the nodes to your VPS server with the help of the MESHdesk node config utility (along with adding them as nodes to the Resevoir Dogs mesh).
Use the MESHdesk node config utility to pre-configure the nodes
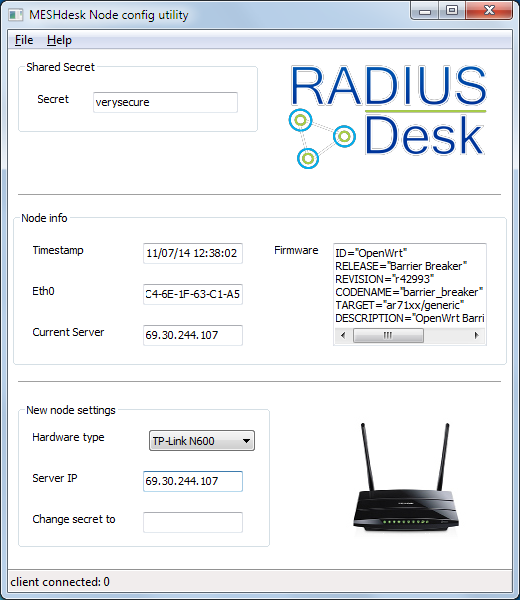
- We use the MESHdesk node config utility to point the mesh nodes to the VPS running the MESHdesk service.
- Download and unzip the MESHdesk_node_config_utility_[version]/zip file on a Windows computer.
- Ensure the Firewall is disabled for this session.
- Configure the Ethernet port of the computer to have IP Address 192.168.255.20.
- Double click the MESHdesk_node_config_utility.exe file located under the extracted MESHdesk_node_config_utility folder.
- Be sure to supply your VPS server's IP Address and well as selecting the correct hardware type. (Our's is 69.30.244.107)
- Connect the computer to one of the four Ethernet ports of the TL-WRD3500.
- The next step is VERY VERY important.
- Make sure the Wireless On/Off switch is turned OFF.
We have to actually turn the WiFi off to make it work! 
- Fire up the TL-WRD3500 while watching the MESHdesk node config utility.
- Shortly after start-up (before 2 minutes)it should have made contact with the MESHdesk node config utility.
- After that you can turn off the power on the TL-WRD3500.
- Take the MAC Address that was recorded and add it to the Resevoir Dogs mesh.
- Once you have completed it for all the available nodes, we can start by connecting our gateway node to the LAN.
- After that node is up and running we can fire up the others.
- The non-gateway nodes will take some time before they get their settings.
- The node first try to get its settings through:
- The LAN
- Radio0 (2.4G)
- Radio1 (5G)
- Since we run the mesh over 5G it will be the last in the row.
Is everything up and running?
- See for yourself
- Note that we use blue lines to indicate a mesh running to the 5G band and green lines for a mesh running on the 2.4G band.
How fast can it go?
- Time for some throughput tests.
- We will connect one computer to a certain Mr and another computer to another Mr and do some iperf testing.
- We have a laptop connecting to Mr Pink and another one connecting to the available nodes
| Iperf server | Iperf client | Speed |
|---|---|---|
| Mr Blonde | Mr Blonde | 15.6Mbits/s |
| Mr Blonde | Mr Pink | 21.8Mbits/s |
| Mr Blonde | Mr Orange | 18.5Mbits/s |
| Mr Blonde | Mr Brown | 29.3Mbits/s |
| Mr Blonde | Mr Blue | 11.7Mbits/s |


